This document covers the installation, set up, and use of this theme, and provides answers and solutions to common problems. We encourage you to first read this document thoroughly if you are experiencing any difficulties before contacting our support team.
Qusq Pro
This help guide also covers features that are only available in the Pro Version of Qusq Pro. If you're interested in upgrading to pro, click here to learn more about the new features.
Qusq Pro has many more customization options including typographic selectors, stylistic color pickers and other add-ons. And in addition to these fantastic features, you'll also receive dashboard one-click updates and access to world-class theme support by our team of in-house professional WordPress developers.
Please note that support is only offered for Qusq Pro. If you already have a Pro license and have any questions that are beyond the scope of this document, feel free to ask us via our dedicated help center.
Purchase Qusq Pro for just a few bucks →
If you're looking for WordPress theme installation and setup to look exactly like the live theme demo and do not feel comfortable to go through all the steps below - then we're here to help. Fast & simple for only $89.
Get our Express Theme Installation & Setup service →
Our in-house team of professional developers will install the theme, upload the demo XML file, and setup your website exactly like the live demo. Frustration free. Complete your purchase of the Theme Setup service by clicking the link above and send us the details below.
Information we will need:
- Domain name (URL)
- FTP information
- WordPress admin credentials
- Theme files or Marketplace purchase code & Username
If you haven't yet done so, please download and install the latest WordPress version on your server from wordpress.org.
If your hosting provider does not provide an automatic "one click" WordPress install, here is a little tutorial to help you do it manually. Installing WordPress tutorial
If you haven't worked with WordPress before, check these tutorials in order to learn at least the minimum WordPress basics.
To upload the theme, through your WordPress Dashboard select Appearance > Themes. Next, click the “Add New” button at the top of the page and then click the “Upload Theme” button, right next to the main headline.
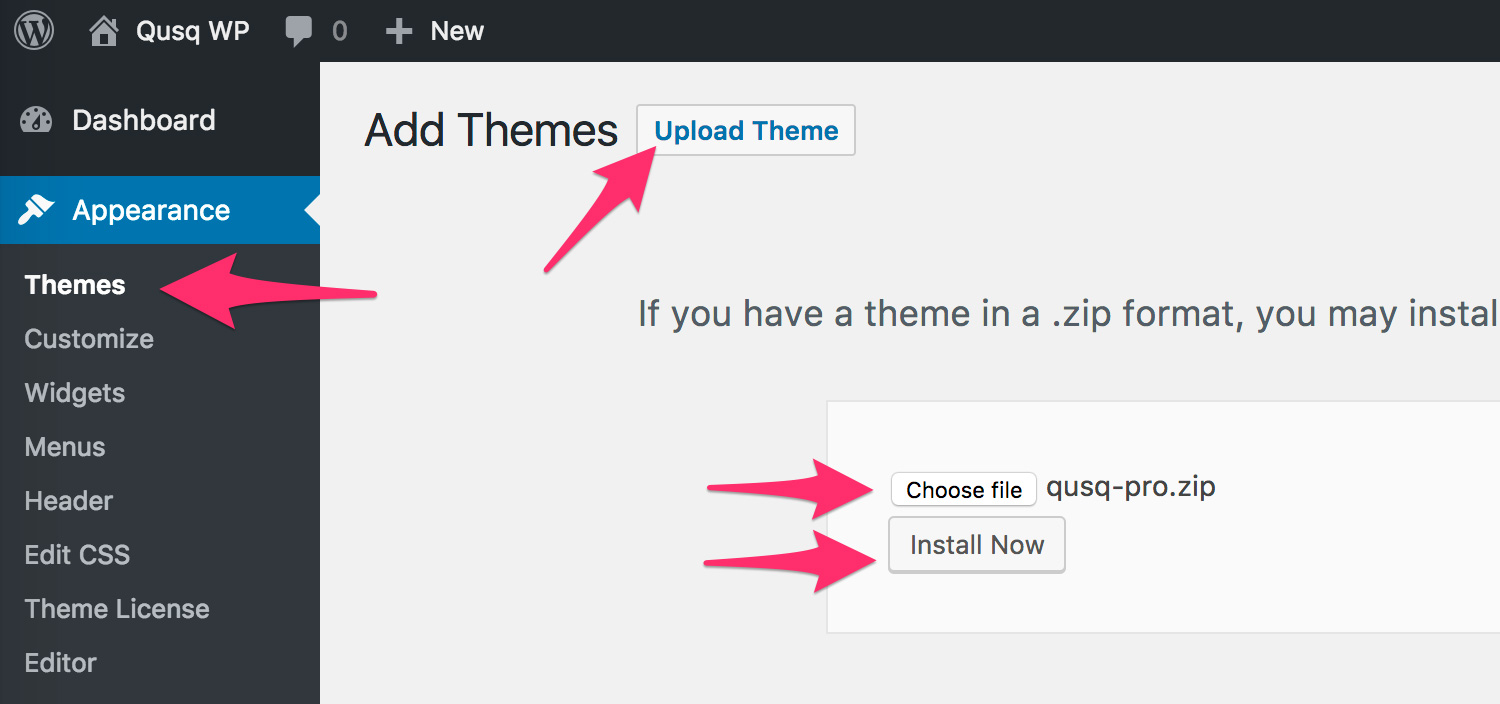
Please ensure you are uploading the theme .zip file, not the entire package you downloaded. In this case, you will be uploading qusq-pro.zip file. Choose it and hit the “Install Now” button.
Once the theme is uploaded and installed, click “Activate” to activate it.
In case of Error "Are you sure you want to do this?"
It means you have an upload file size limit and you should either install the theme via FTP (see next step), or call your hosting company and ask them to increase the limit. Provide the following information: upload_max_filesize and post_max_size and ask them to set it to 40MB.
To manually upload your new WordPress theme, login with your credentials to your website and locate the wp-content folder in your WordPress install files.
First un-zip the qusq-pro.zip file, then upload the un-zipped qusq-pro folder into the wp-content/themes folder.
Once uploaded, activate the theme by heading to the Appearance > Themes menu in the WordPress Dashboard. Locate the Qusq Pro theme and hit Activate.
To be able to use the full potential of Qusq theme there is a set of plugins the theme was made specifically to work with. After the theme is activated in the WordPress administration area, you will see a notification containing all recommended plugins. Go ahead and Begin Installing them.
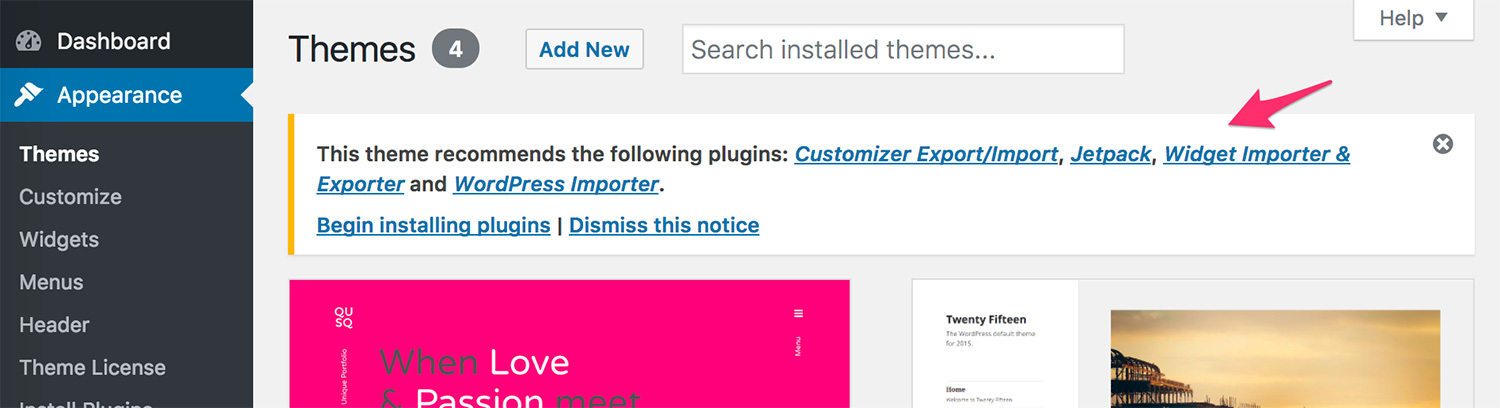
If the notification is not visible, simply navigate to Appearance -> Install Plugins to see the complete list. It is up to you to decide which plugins you want to use.

To install all plugins at one or just some of them, tick the checkbox before each of them and from the "Bulk Actions" dropdown select Install and the hit the Apply button.
- JetPack by WordPress.com - Adds Portfolio, Contact Form, Infinite Scroll, Tiled Galleries, Image Carousel, Comment Likes, Sharing buttons, Awesome Widgets, etc...
- WordPress Importer - Imports demo content - posts, pages, images, navigation, etc..
- Customizer Export/Import - imports customizer settings used in our live demo page.
- Widget Importer & Exporter - imports the widgets used in our live demo page.
Optional Shortcodes Plugin
You can also manually download & install our free optional plugin to enhance your website with a set of shortcodes, like buttons, icons, toggles, accordions... IshYoBoy Shortcodes Plugin - A small set of shortcodes for better content handling.
The installation of external plugins, is done via Plugins > Add New > Upload Plugin and uploading the downloaded plugin's .zip file.
Read more about the shortcodes in the Shortcodes Section →
Optional Woocommerce Shop Plugin
Qusq Pro allows you to turn your website into advanced ecommerce shop by ensuring 100% compatibility with the free WooCommerce Plugin. The plugin is not included and needs to be installed separately from the official WordPress plugin repository.
You can download & install WooCommerce Plugin by navigating to Plugins > Add New in WordPress administration and using the search field to look for woocommerce. Then simply Install and activate the plugin.
Read more about the WooCommerce in the WooCommerce Section →
To import the demo content, the WordPress Importer plugin must be installed & active. Head to your WordPress Administration and open Tools -> Import -> WordPress section and hit the "Run Importer" below it.
Within the package contents, inside the Demo Content folder, you'll find qusq-pro-content.xml file. This file contains the live demo's content (Pages, Posts, Portfolio Items, Navigation Menus, etc..).
All essential plugins such as JetPack, importer plugins, etc.. must be active before the import, otherwise some data may not be imported.
Choose the qusq-pro-content.xml file and hit the "Upload file & import" button.
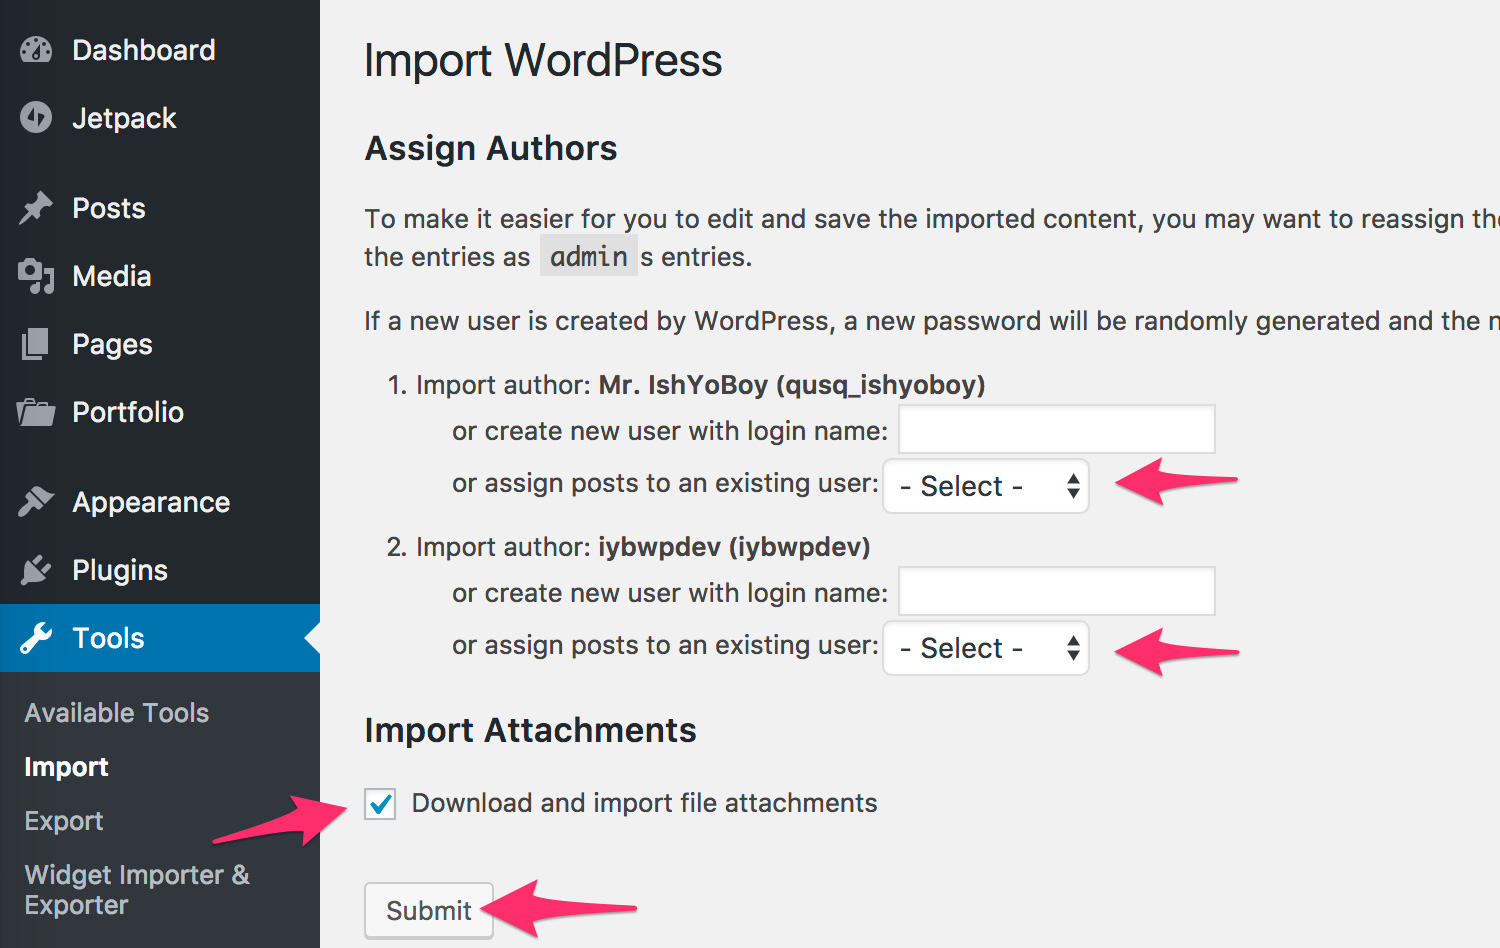
Make sure to check the import attachments options, so all images and files are imported too. You can then choose to assign all posts to an existing user from the drop-down menu and hit Submit.
To import customizer settings, the Customizer Export/Import plugin must be installed & active. Head to your theme Customizer Appearance > Customize and look for the Export/Import section.
Within the package contents, inside the Demo Content folder, you'll find qusq-pro-customizer.dat file. Upload that file with the uploader within that section and hit Import.

It is rather important to set your theme menu in the WordPress Dashboard. To do this, locate the Menu options by selecting the Appearance -> Menus in WordPress administration.
Failing to create a WordPress Navigation Menu and attaching to a location will list all your existing pages in the navigation without allowing you to edit it.
Qusq supports 2 menu locations, "Primary" and "Social Links", and they both need to have Navigation Menus attached to them.
Primary Menu Location
To assign a menu from the menus imported in the previous steps, choose "Main Navigation" from the drop-down list and hit the "Select" button. You can add it to the "Primary" menu location via the Menu Settings, below the Menu Structure area.
To create a new menu and assign it to a location first click the create a new menu link, choose a name for it and hit the "Create Menu" button. The menu will be automatically selected for editing. Add pages and links to the menu you just created in the Menu Structure area. You can add it to a menu location via the Menu Settings, below the Menu Structure area.

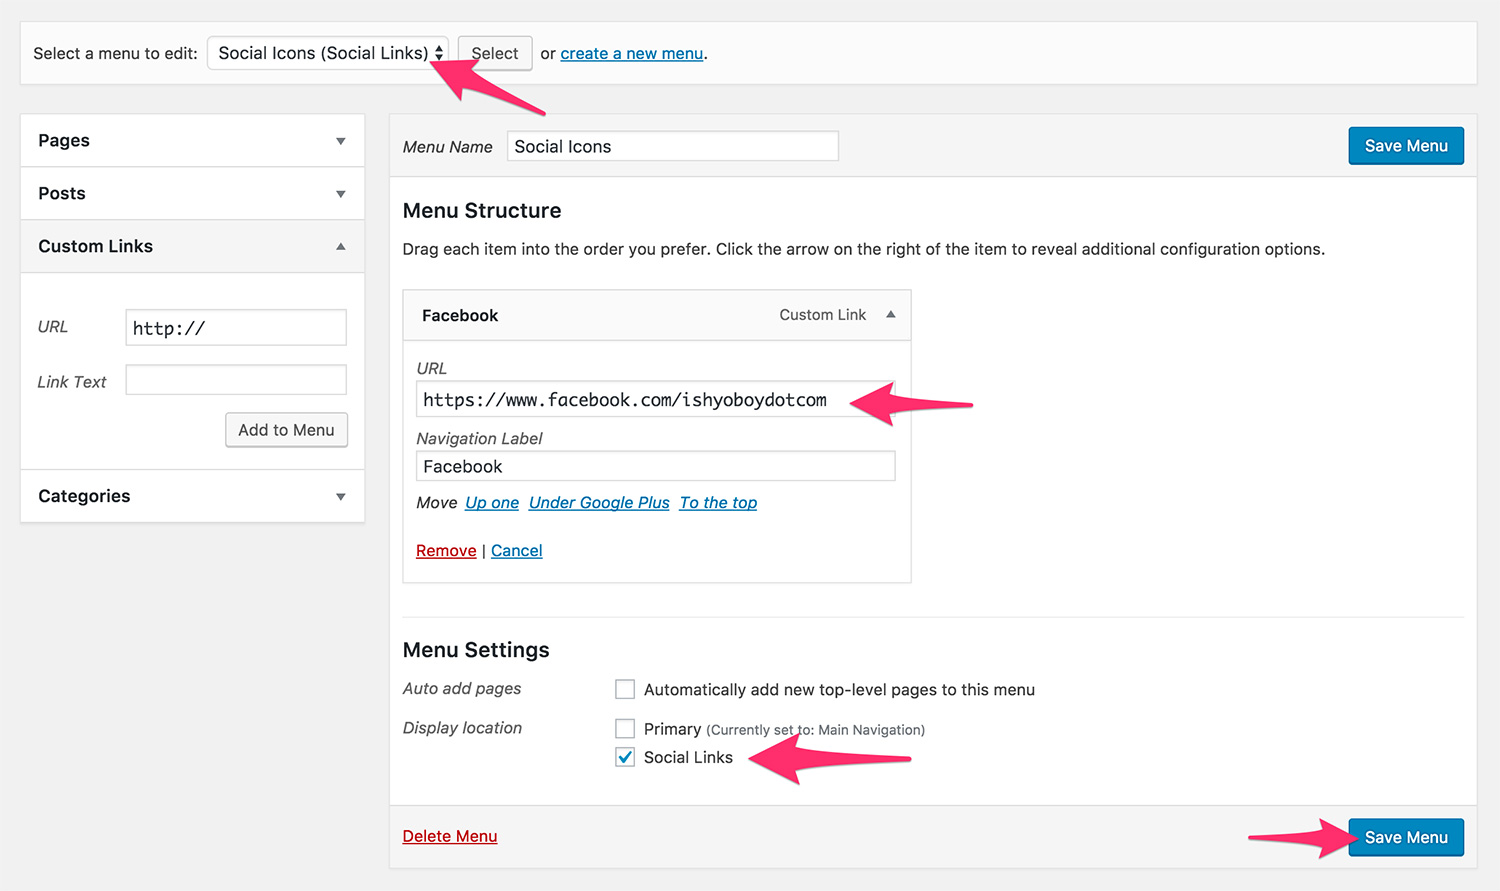
Social Links Menu
The Social Links Menu is populated in both the site footer and the side navigation area of the theme. Make sure you have created a menu, selected it for editing and successfully attached it to the "Social Links" location.
To add the icons, simply create a custom link to the social media and Qusq Pro will take care of the rest based on the URL of the media.

Social Links Menu in the "side navigation" area.

Social Links Menu in the footer area.
The following social media icons are supported:
- behance.net
- bitbucket.org
- codepen.io
- deviantart.com
- digg.com
- dribbble.com
- dropbox.com
- facebook.com
- flickr.com
- foursquare.com
- plus.google.com
- github.com
- instagram.com
- jsfiddle.net
- last.fm
- linkedin.com
- mailto:
- pinterest.com
- reddit.com
- renren.com
- skype.com
- skype:
- slack.com
- stackexchange.com
- stackoverflow.com
- slideshare.net
- snapchat.com
- soundcloud.com
- spotify.com
- steamcommunity.com
- stumbleupon.com
- tel:
- tripadvisor.com
- tumblr.com
- twitch.tv
- twitter.com
- vimeo.com
- vine.co
- vk.com
- weibo.com
- whatsapp:
- wordpress
- yelp.com
- youtube.com
- xing.com
Usually users use a static page for a front page (or "home") and the blog is set to be displayed on a separate page. WordPress however, displays the latest posts on the front page ("home") and there is no specific "Blog" section by default.
To change this setting and to match the setting on our live preview head out to Settings > Reading section from WordPress Administration area.
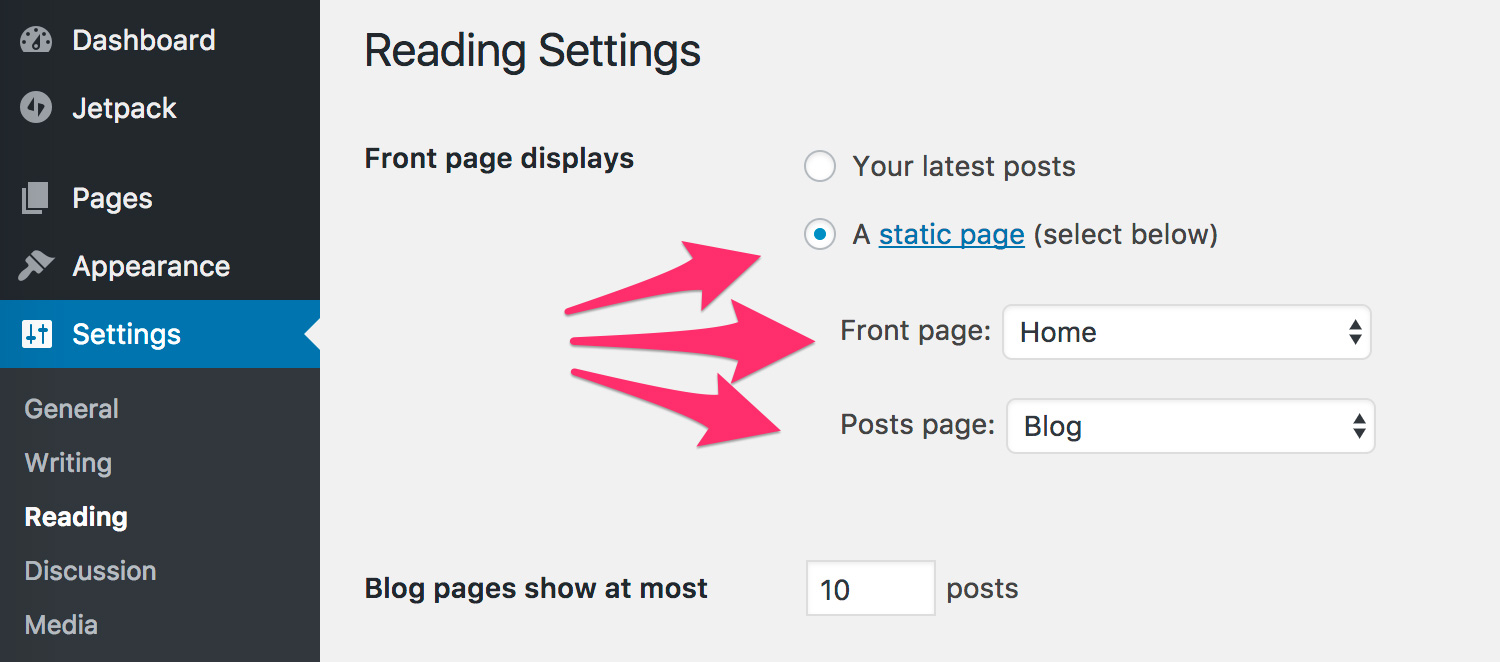
Once there, select the A static page (select below) radio option. For the "Front page:" option choose "Home" and for the "Posts page:" choose the "Blog" page. Hit the "Save Changes" button and you are ready!
If you do not have the pages yet, simply create empty pages and come back to set the settings mentioned above.
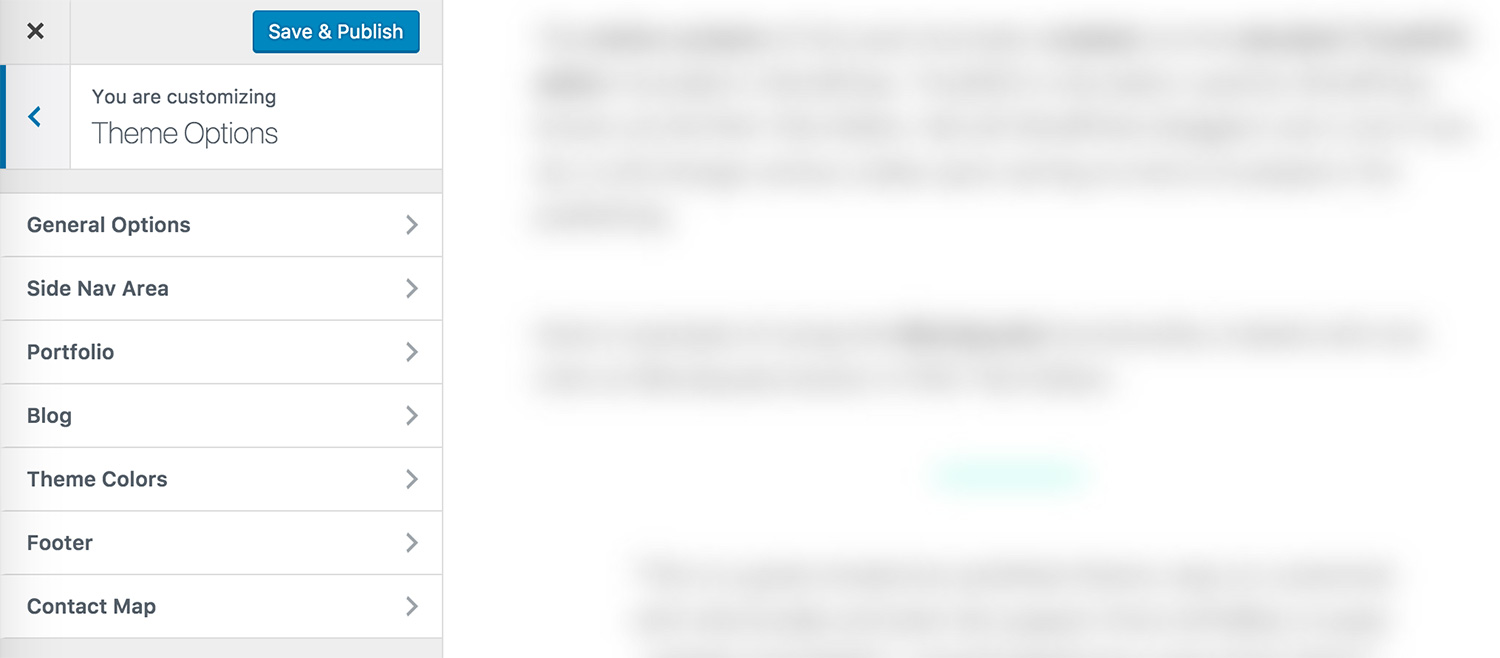
To access the live Customizer, you may select the Customize button in the admin bar dropdown or select "Appearance > Customize" from the Dashboard menu. Note that you must be logged in as a site administrator in order to access the controls.
All theme options are grouped under the "Theme Options" tab within the customizer. Apart from them, you can edit and modify all standard WordPress Customizer options.

Theme Options
Please take your time to explore all options under "Theme Options" section as this is where you can modify all Colors, Portfolio options, Blog settings, etc..
These were all necessary steps to import & setup your theme as it is on our live preview server. Now you can start updating all the content to your needs.
The sections below will help you better understand how the theme works and what is necessary to do in order to have all theme parts work correctly.
Make sure to check the Advance Header Titles, as this is an essential feature of Qusq theme.
If you have a problem with the theme or found a bug, please let us know via our official Help Center. We take pride in our customer support and we will do what we can to assist you. If you are experiencing a theme issue, please first turn off all third party plugins to see if the problem persists.
Please note that support is only offered for Qusq Pro. If you already have a Pro license and have any questions that are beyond the scope of this document, feel free to ask us via our dedicated help center.
Qusq Pro has the following templates built into the theme and can be applied by creating and saving a page in WordPress.
Page Templates:
- Default Template
- About Page
- Contact Page
- Contact Page - Map
- Homepage - Portfolio
- Page - Large content overlay
- Page - Medium content overlay
- Page - Small content overlay
- Team Page
Portfolio Projects Templates:
- Default Template
- Project - 2 Columns - Left Gallery
- Project - 2 Columns - Right Gallery
Creating a new Page is a standard WordPress feature. If you are not familiar with how to do it, please make sure to re-check the basics of working with WordPress. See the list of links in WordPress Installation section.
Advanced Header Titles & Colors
All pages support Qusq's "Advanced Header Titles" feature as well as "Header Colors" and "Header Color Animation" as explained in the Advance Header Titles section.
Content Overlay Control
You can chose from one of the three content overlay templates to control how much the content will be overlapping the header section when scrolling. This comes specifically in handy when the Page starts with an image, title or a regular paragraph of text.
Templates:
- Page - Large content overlay
- Page - Medium content overlay
- Page - Small content overlay
To see all available templates within the theme please navigate to the Templates section.
Qusq Pro comes with a beautiful parallax scrolling portfolio to help you display your Projects in a very sleek, colorful and interesting way.
Portfolio Plugin Installation
To enable the Portfolio functionality make sure the JetPack by WordPress.com plugin is installed and active.
Once you've successfully activated the plugin, you should see a Portfolio tab in your WordPress Dashboard Sidebar.
If it is not there, navigate to Jetpack -> Settings, enter the Writing tab and scroll down to Custom content types section and make sure the "Portfolios" setting is enabled.
Creating portfolio posts is done exactly the same as standard posts. In addition, three portfolio templates are supported to define the layout of each project. To select the right template, edit an existing or create a new portfolio project and from the right-hand side column, in "Post Attributes" box pick the one that fits most.

Creating your Portfolio Page
You need to create a new page and ensure its slug is "portfolio". That is it. Qusq will take care of the rest.
Featured Images
Upload a featured image - any size will work. The images will be automatically applied throughout all the necessary templates and loops.
Gallery Images
To add a gallery to a portfolio project, simply add it to the content editor using the "Add Media" button or as "Gallery" block if using Gutenberg editor.
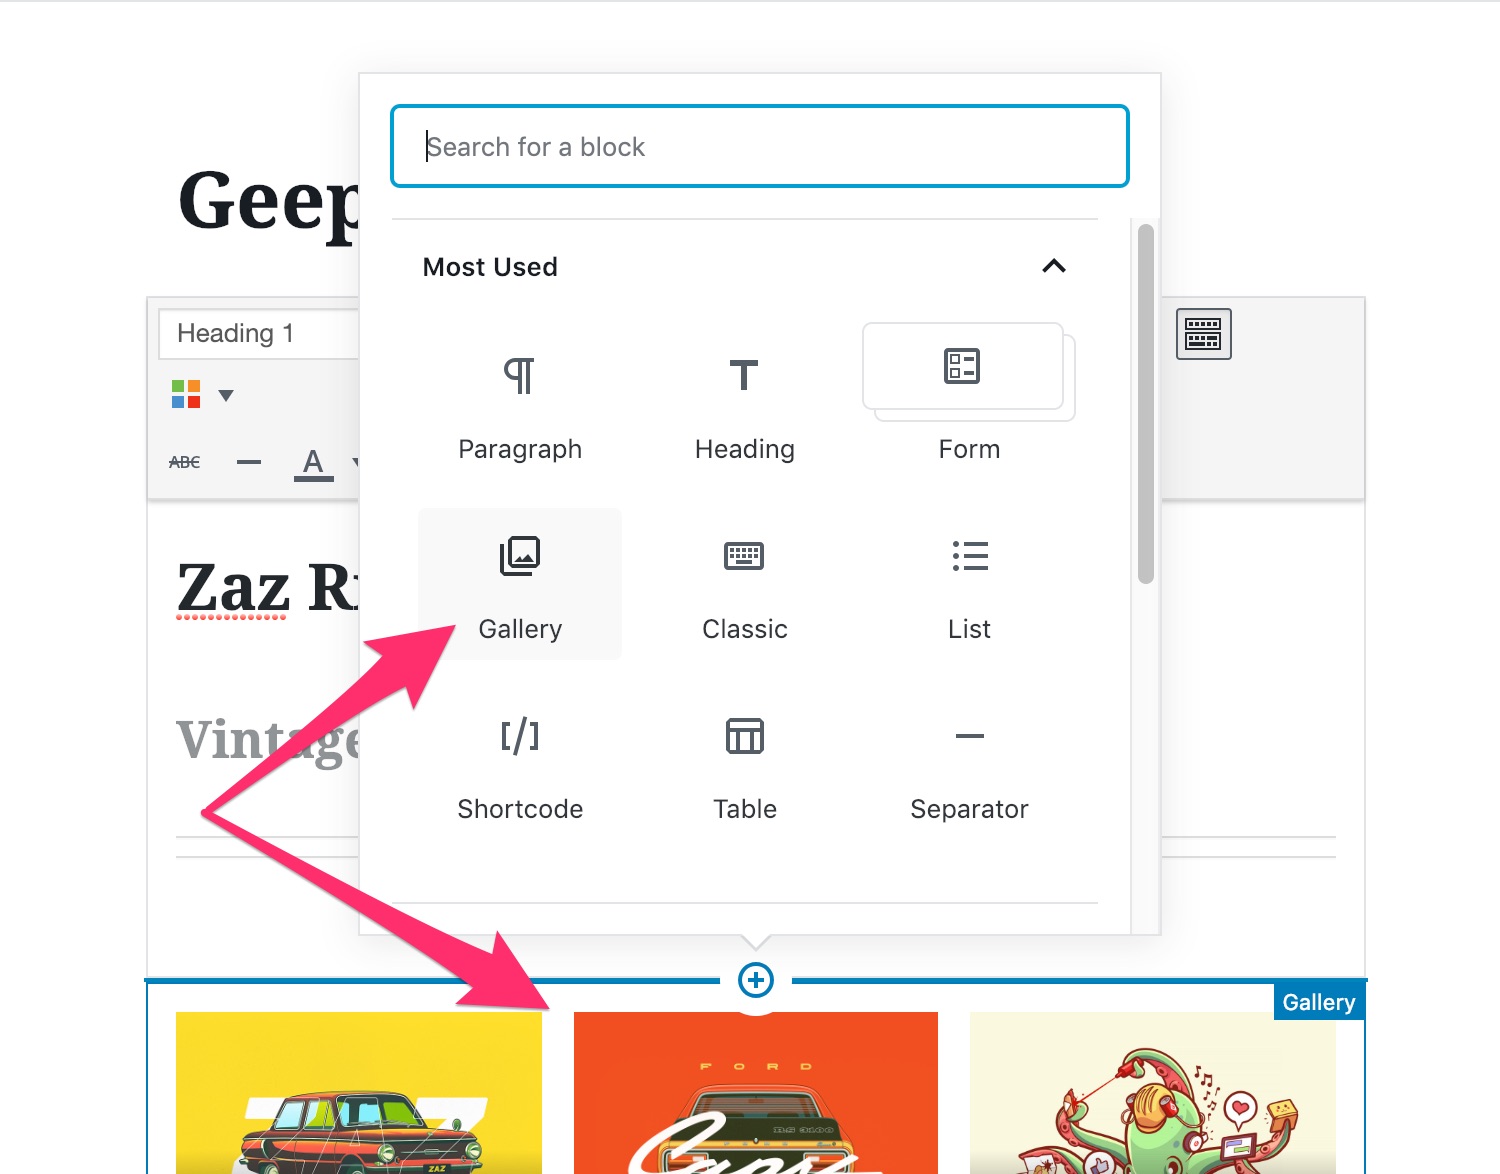
No matter where it is placed within the post and what layout is chosen, Qusq will automatically take the first regular WordPress gallery and transform it to a one that fits the chosen Project Template layout (Left, Right or Default).
Portfolio Captions
You may add captions to your portfolio gallery image uploads within the Edit Gallery modal (the same modal where you orignially uploaded images to your portfolio post). Just add your caption to the "Caption this image" text box directly below each image, and your caption will appear on the portfolio post.

Portfolio Headers
By default Qusq will output only the post's Title in the header area. If you want to add additional sub-title and content please see the Customizing Headers section.
There is no specific page representing the whole portfolio as this is dynamically generated content. The only way to control the header title and sub-title in this case is by creating a page with a "portfolio" slug and setting the headers in it. If you manually change the portfolio slug in the customizer's "Theme Options" area, please make sure the page for the headers will also have the same "slug".

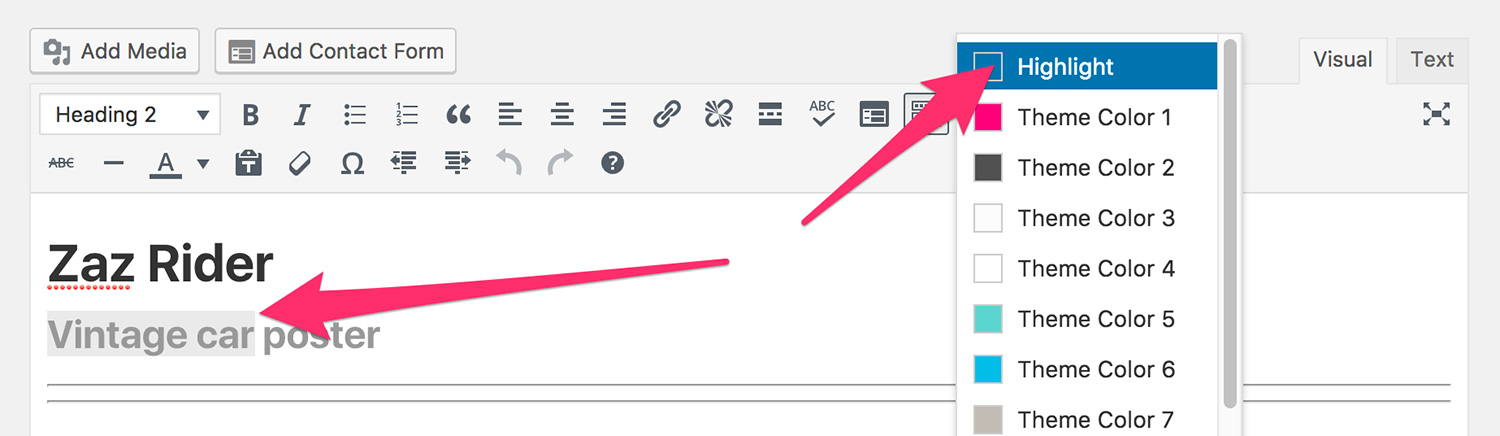
Portfolio Colors
To make the post detail pages colorful, you can use the theme's header coloring feature for each post. Check the Header Colors section for more details.
Portfolio Colors Animation
To make the header area even more interesting there is an option to use automatic color transition. Check the Header Colors Animation section for more details.
Portfolio Custom Fields
Each portfolio post supports the standard WordPress Custom Fields. To enable them in the edit screen click on the menu in the right top corner, click on "Options" and make sure the "Custom Fields" checkbox is ticked.
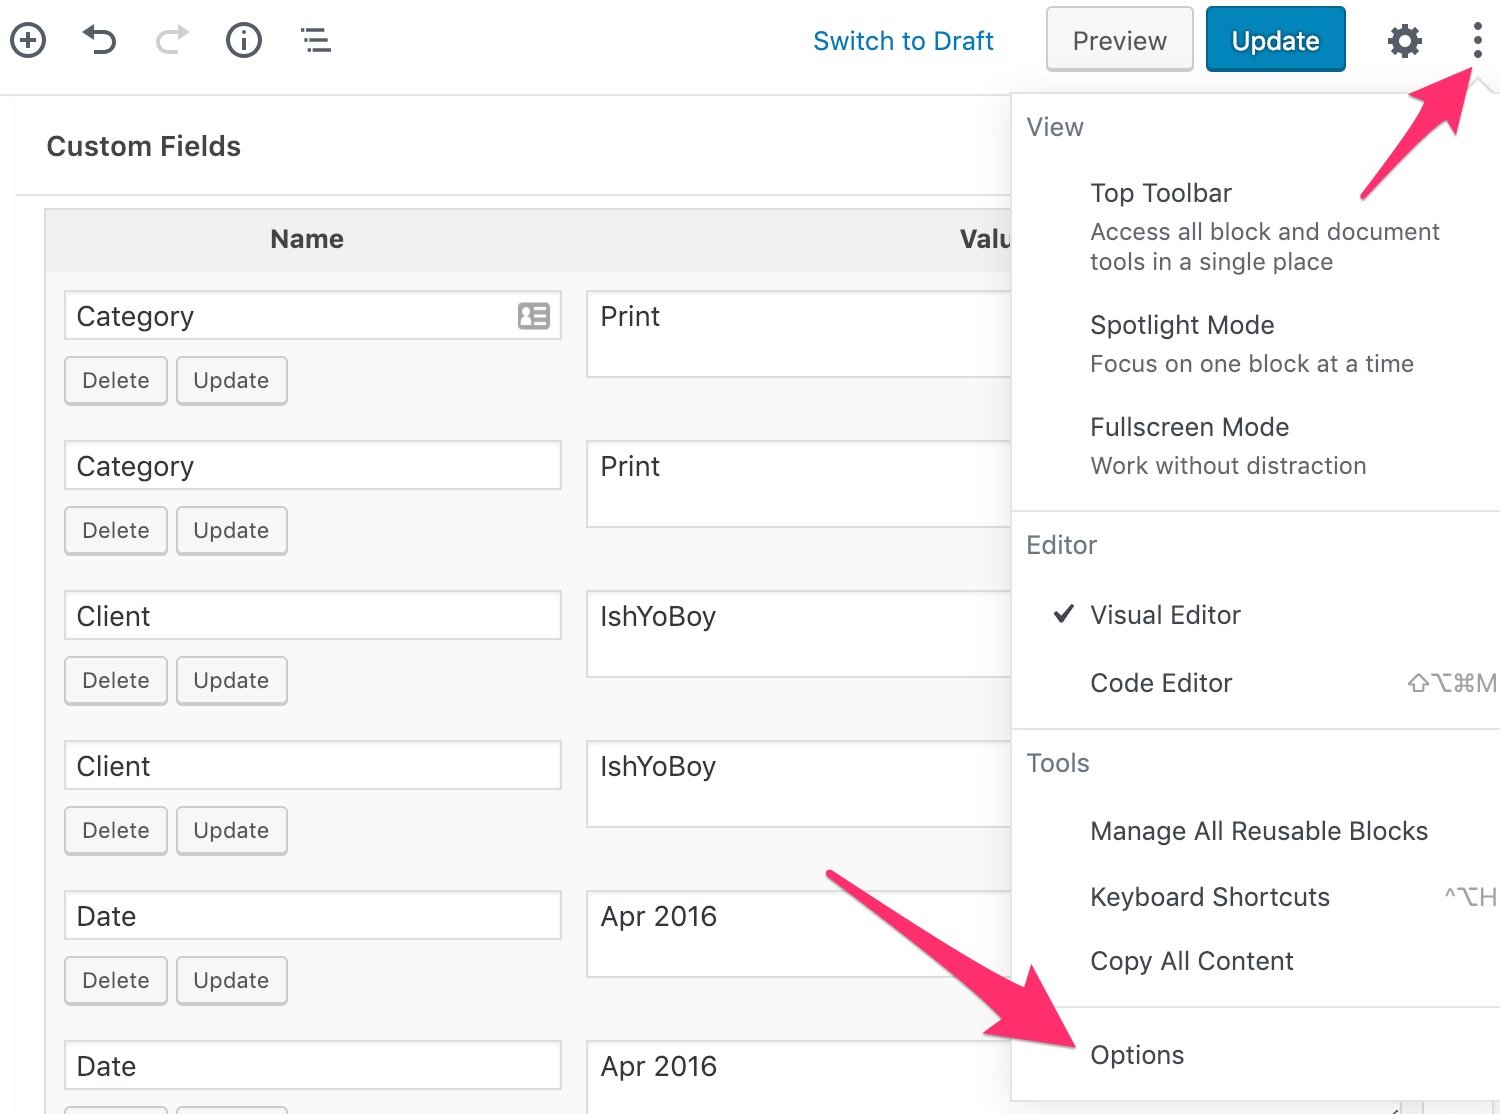
You can add any amount of "Name - Value" pairs depending on what your project needs.
These fields will be automatically output under the content of the post in an ordered list with the Names highlighted in the post's color..

Portfolio Layout Options
Located within Appearance > Customize > Theme Options, you will find a "Portfolio" section. Here you may tweak the Portfolio's behavior and options.
The Blog is an essential WordPress functionality. The posts can be either displayed on the homepage or on a specific page based on the setting under Appearance > Customize inside "Static Front Page" section in WordPress Administration.
Homepage - Latest Posts
If the latest posts are displayed on the homepage, there is no specific page representing it as this is dynamically generated content. The only way to control the header title and sub-title in this case is by creating a page named "Blog" with a "blog" slug and setting the headers in it.

Blog Layout Customization
The theme provides a few options which define how the blog posts will be displayed. Please navigate to "Appearance > Custopmize > Theme Options" located in the WordPress administration and open the "Blog" tab to see all available settings.
Creating a Blog Post
The creation of a blog post is a standard WordPress feature so there is nothing special about it. The only unique aspect is setting the color & titles as explained in Header Titles section.
Only available in the Qusq Pro version.
Qusq Pro has a built-in Team overview functionality. This feature is specifically useful for small teams wanting to present their members with some small info and details about each team member.

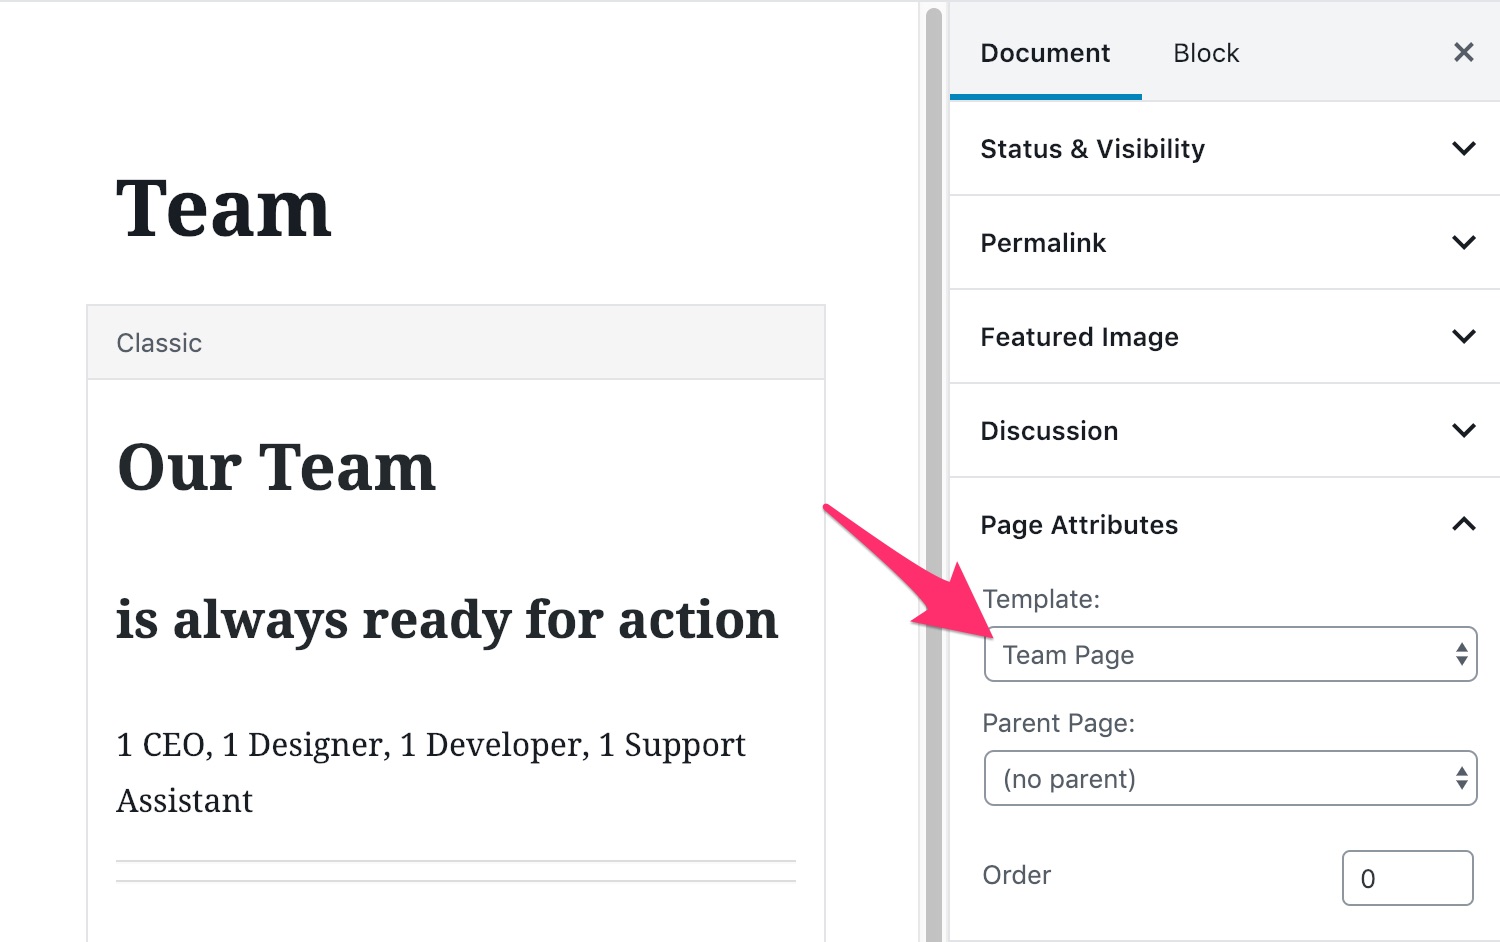
Creating your Team Page
You need to create a new page, edit it and set its template to be "Team Page". When this is done, this page will display all team members. Now we just need to create each member.
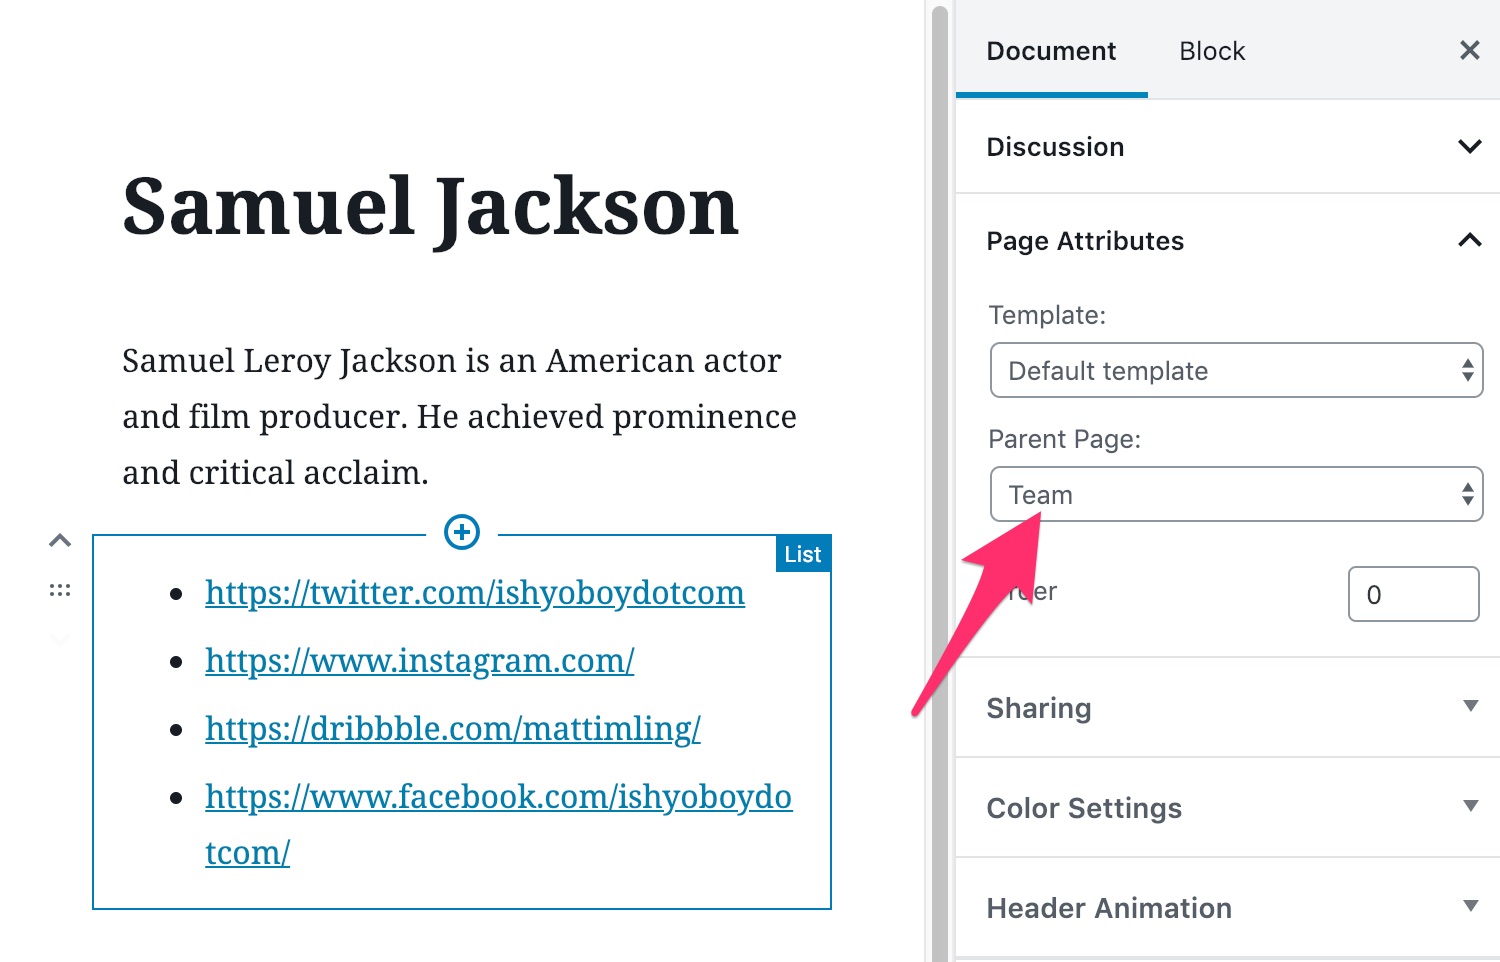
Creating a Team Member
Team members are regular WordPress Pages with the only difference that their "Parent Page" needs to be set to be the "Team" page you've just created in the previous step.
Attention, the "Team Page" template should not be set for team members pages.
Team Member's Details
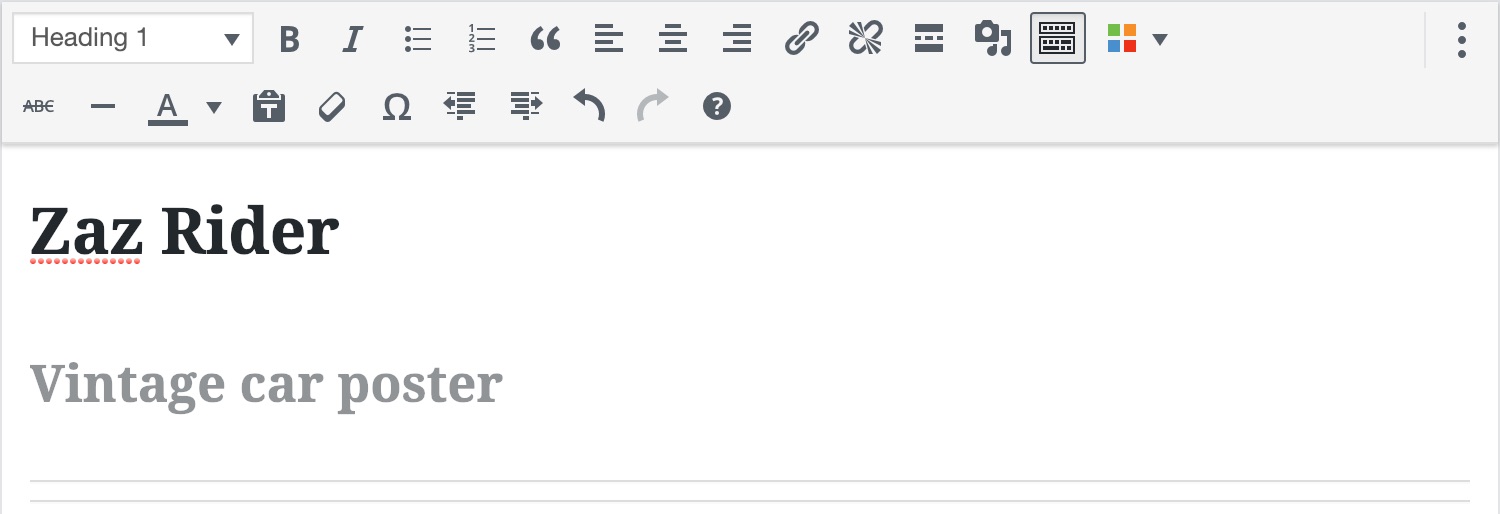
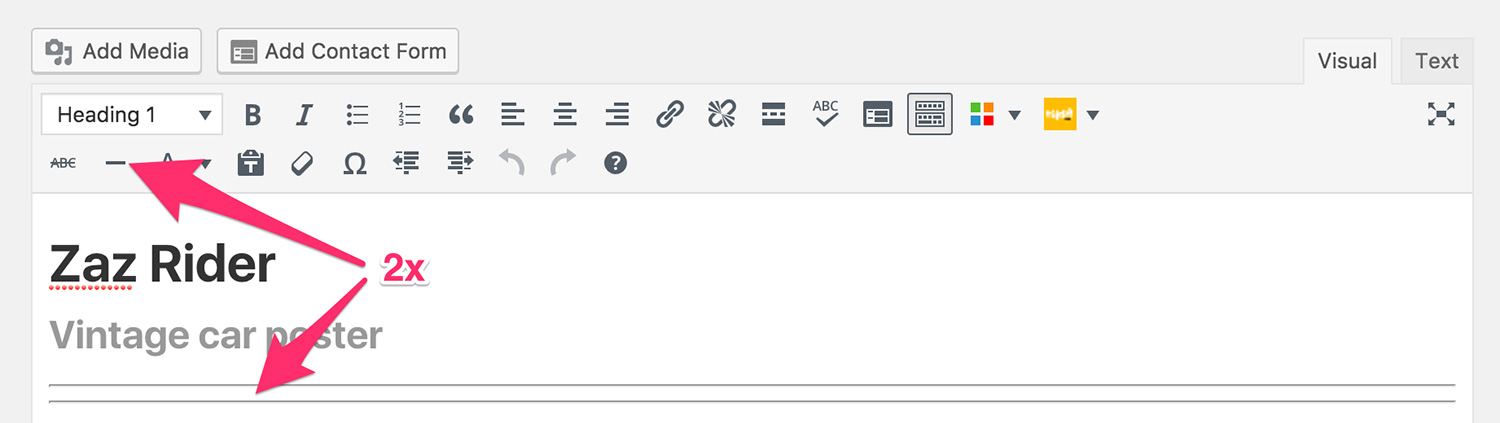
To make your team section exactly as per our live demo you need to enter the following details:
- Page Title - The name of the team member.
- Featured Image - The team member photo.
- Featured Image Caption - The team member position displayed next to the photo.
- Page Content - Short description about the member.
- Unordered List of social links - (optional) Social links.
Team Member's Social Icons
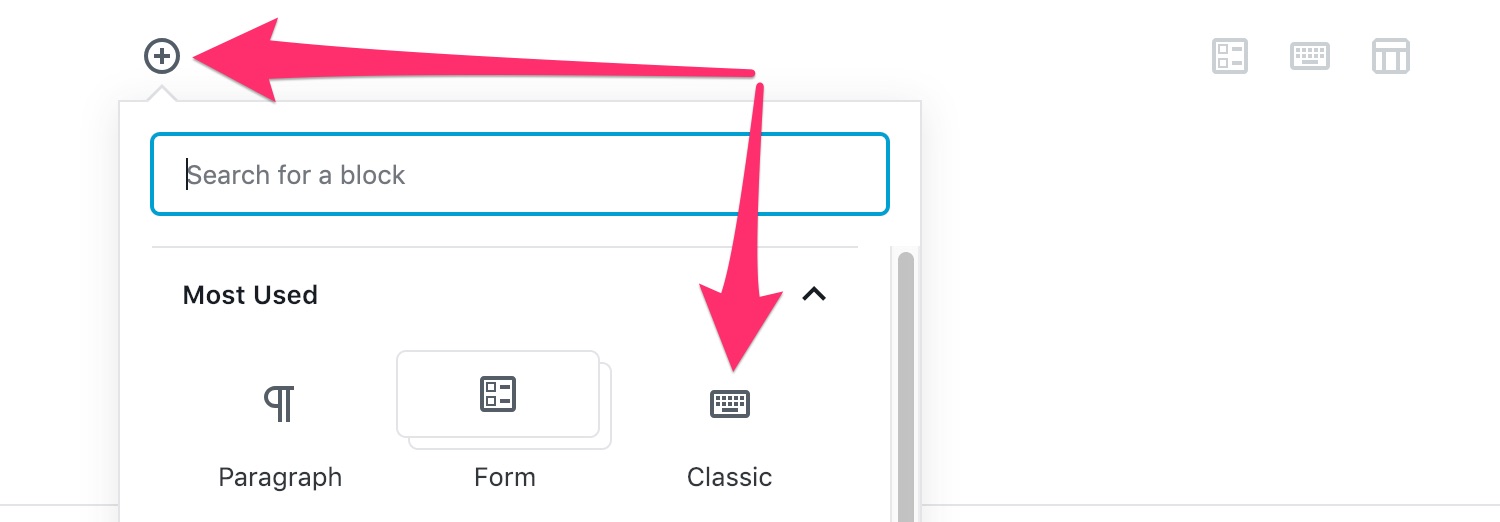
To create a list of Social Links which will be transformed into Social Icons linking to the given links we first need to create a "List" block by clicking on the button in the visual editor and then entering the URLs, but ensuring they are transformed into links by clicking on the "Link" icon in the visual editor.
To let WordPress transform these links into social icons, one more step is necessary. Please open the "Advanced" tab in the right hand side column and add ish-social to the "Additional CSS Class" field.

That's it. All links will now be transformed if they can be found in the list of supported icons.
If you set the "About Page" page template to any page, it will allow you to automatically pull the info of a WordPress user and display it. You first need to save the page, so that the additional boxes, specific to this template, will be enabled.

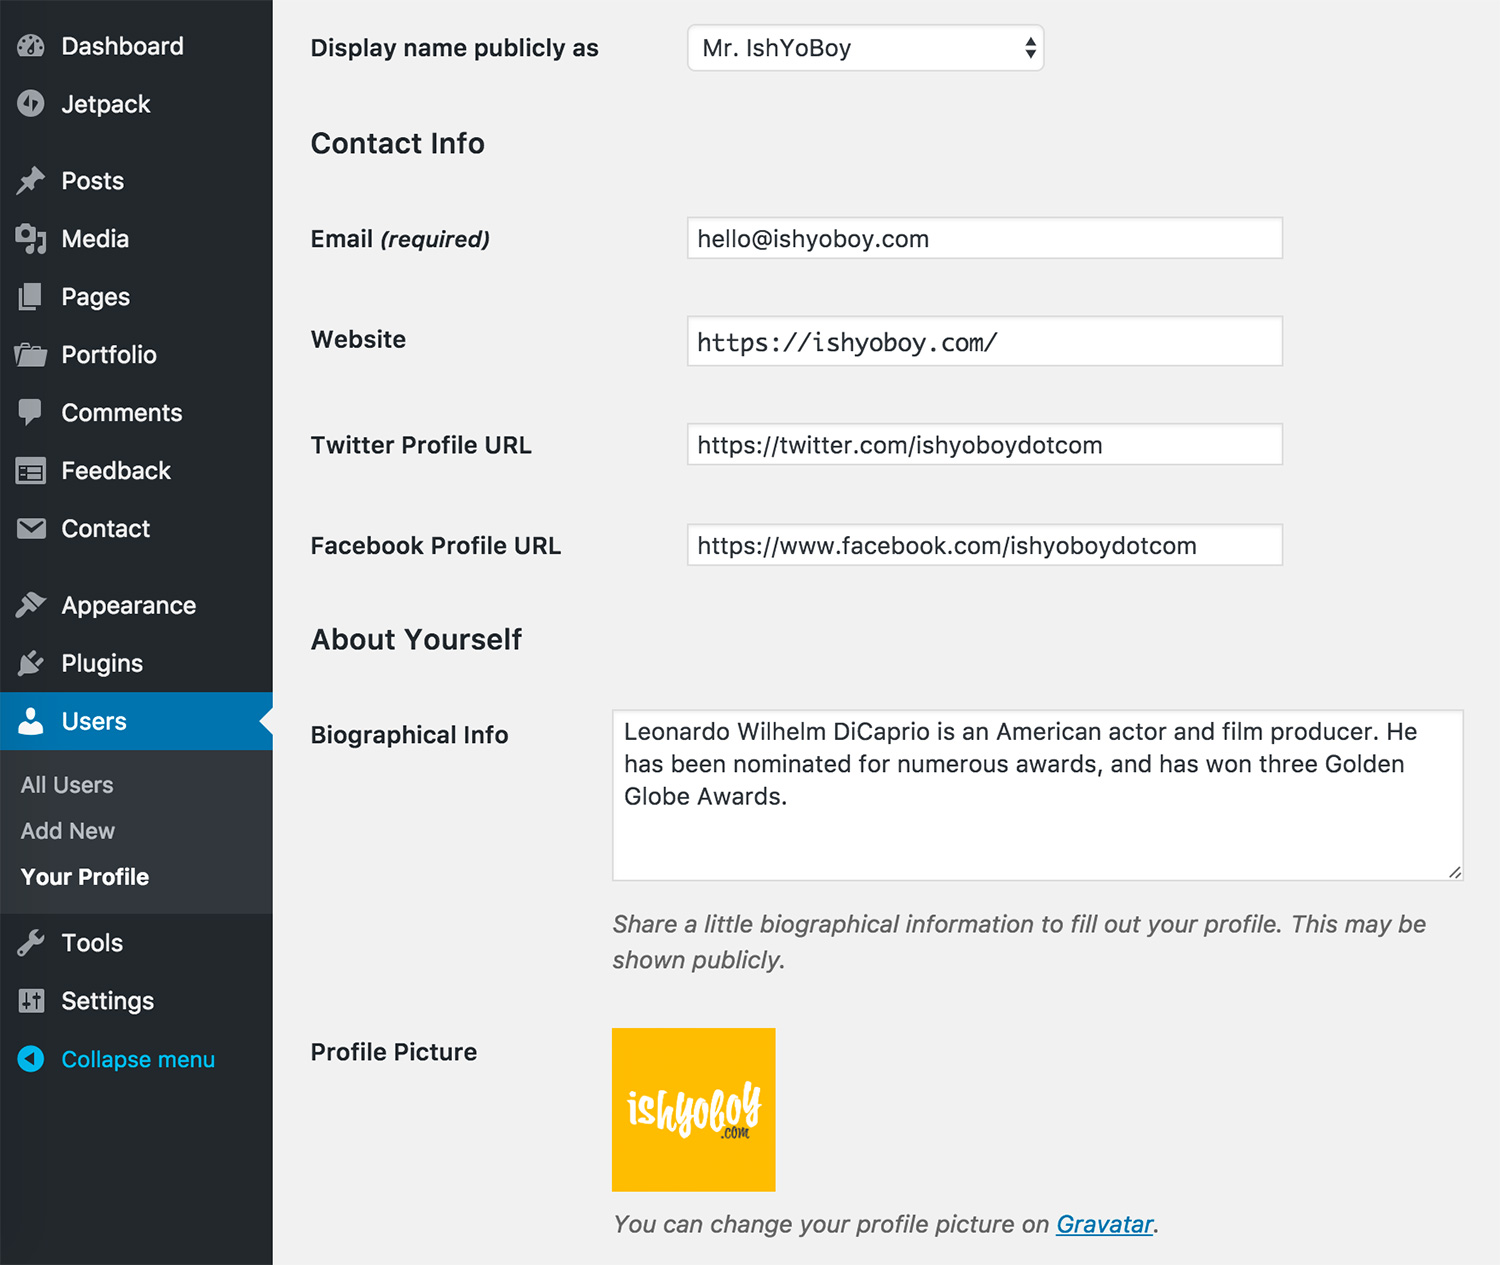
About Page - User Details
Once saved, the template will allow you to chose which user's details will be pulled. It will load the user's display name, description and social links if entered in the user's details in WordPress administration area. To edit the details simply navigate to Users and edit the user you need.
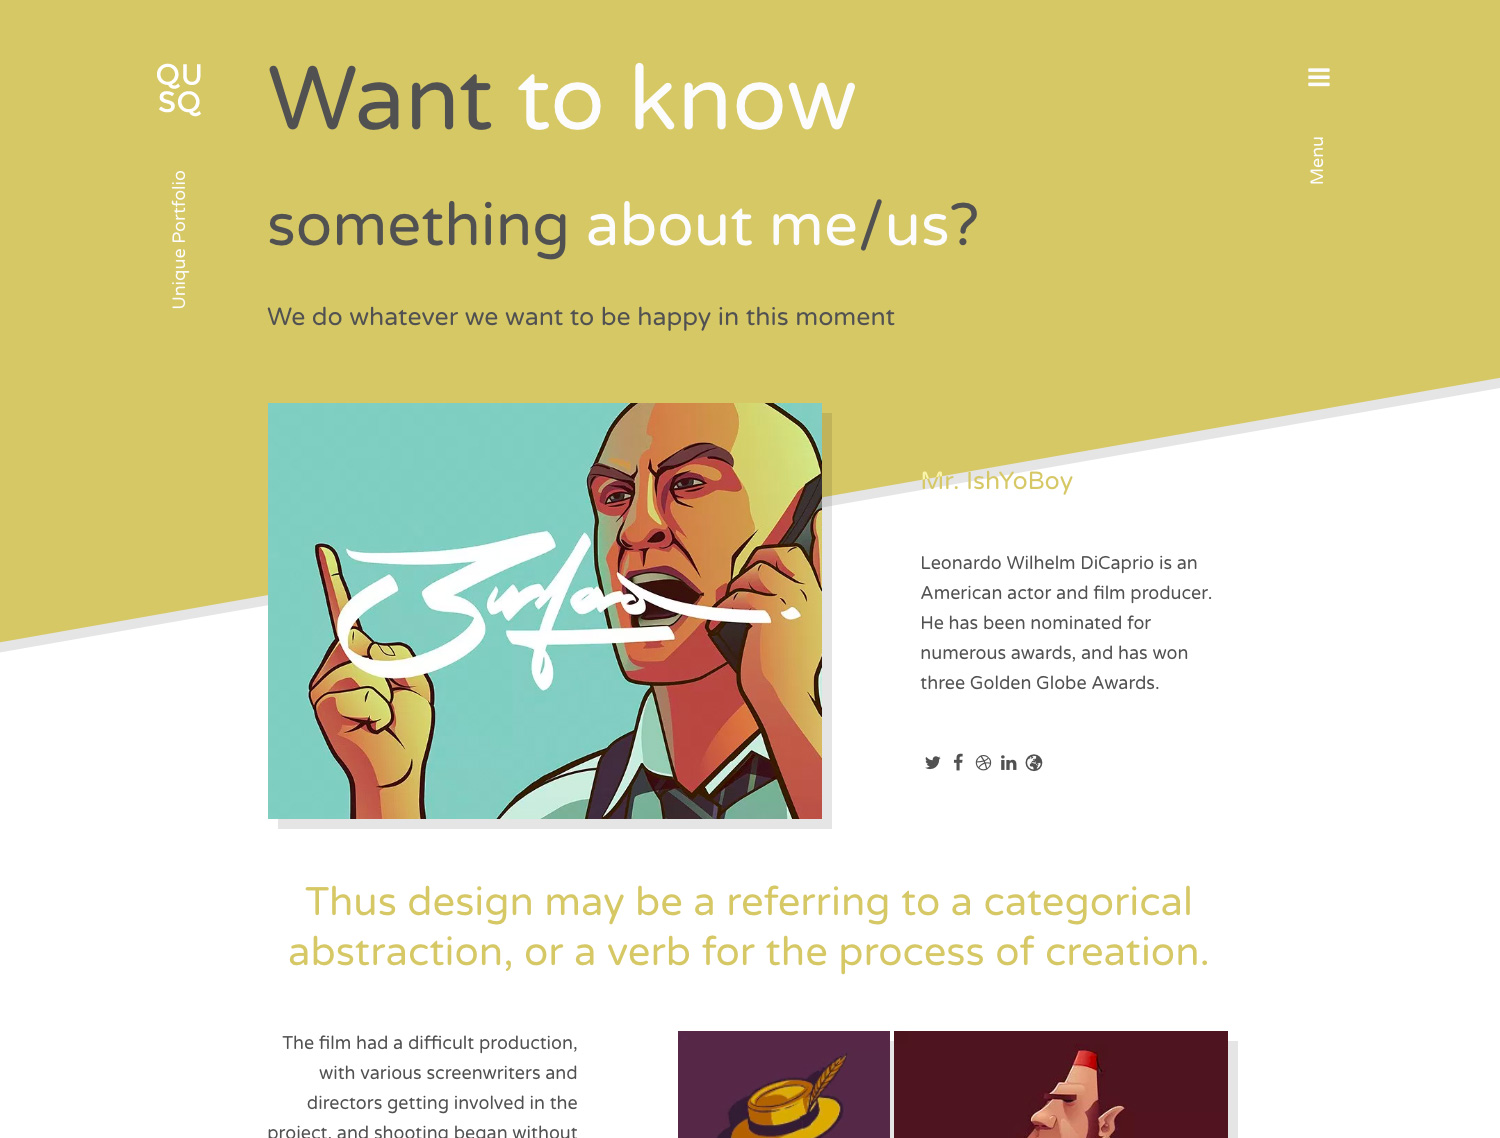
If a featured image is set for the "About Page", it will override the user's avatar set in their settings. This will allow you to upload higher quality photo.
About Page - Content
Moreover the first headline within the content will be displayed in full-width. The first gallery in the content will be displayed in a right column and the remaining text will be displayed in a lef column.
Too see the final result, please check the About Page on our live demo.
To provide you with a set of useful elements like buttons, icons, tabs, toggles, etc..., Qusq is compatible with our free IshYoBoy Shortcodes Plugin. You can download and activate it to extend the default set of content elements.
See all Shortcodes in action on our Live Demo page →
Shortcode Attributes
Once element selected from the dropdown menu it will enter a shortcode into the content. The shortcode consists of an opening tag, closing tag and attributes which can be changes. E.g.
[button size="large" url="#" open_new_window="no" color="1"]Button Text[/button]
The names of all attributes are intuitive and self explanatory. In the example above, the available attributes are:
- size - "large", "medium" or "small" which defines the size of the final button
- url - enter the URL of the page to be opened. E.g.: "http://ishyoboy.com"
- open_new_window - "yes" or "no" values. Whether a new window will be opened
- color - numeric value "1" ... "N" to define one of the theme colors
- content - "Button Text" - the text in the button.
Always make sure the shortcodes are correctly nested and closed [tag] ... [/tag] as failing to do so will generate errors and will break your page content.
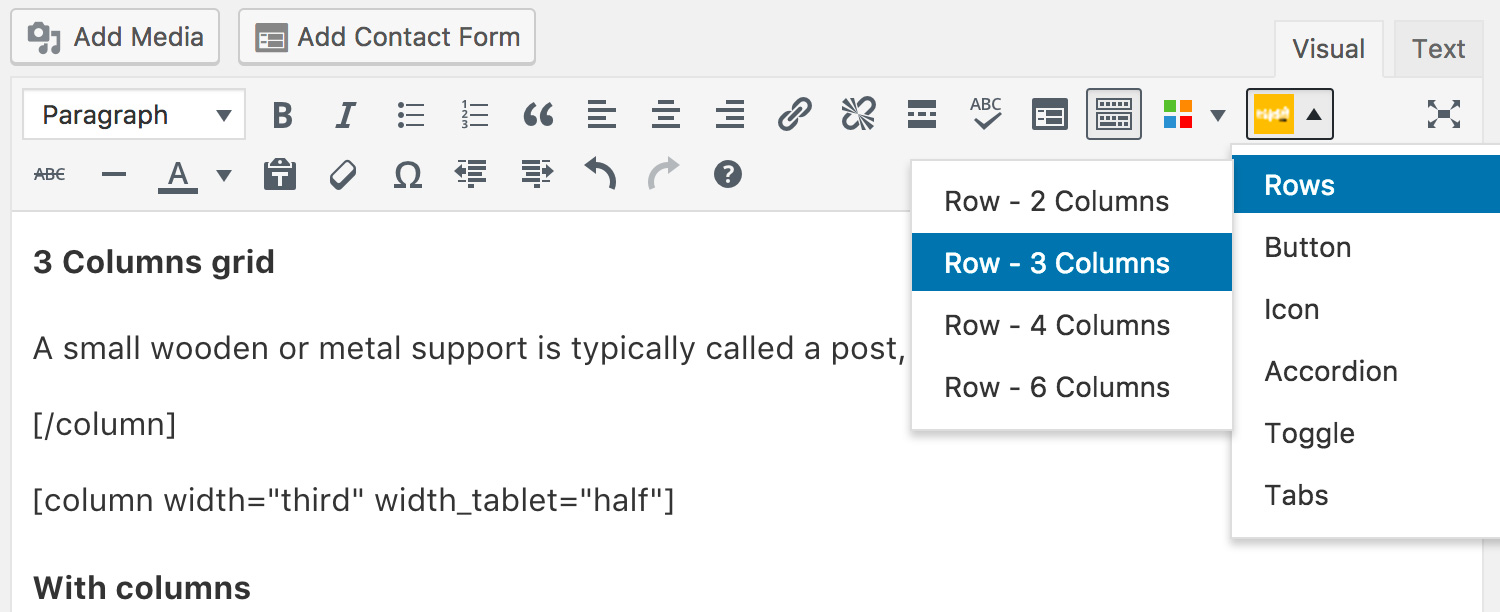
Columns & Grid System
With our plugin you can easily put your content in columns to make it even more attractive. Simply select the "Rows" shortcode sub-menu and pick the row that fits your needs. The grid system was built over the Flexbox Grid System so if you are familiar with it, you will be able to use all advanced features of the grid system. This is an example of a 2 Columns layout:
            [row]

            [column width="half"]This is the shortcode content.[/column]

            [column width="half"]This is the shortcode content.[/column]

            [/row]
Advance Grid System
To fine-tune how the columns will be displayed in different screen sizes and devices. Simply use the additional attributes:
- width_phone - the width of columns on screens smaller than 768px
- width_tablet - the width of columns on screens smaller than 1024px
- width_laptop - the width of columns on screens smaller than 1200px
- width - the width of columns on screens bigger or equal to 768px unless other sizes specified.
All columns are automatically transformed to full-width on phones by default, to keep a clean and consistent design.
            [row]


            [column width="sixth" width_laptop="third" width_tablet="half"]Content[/column]


            [column width="sixth" width_laptop="third" width_tablet="half"]Content[/column]


            [column width="sixth" width_laptop="third" width_tablet="half"]Content[/column]


            [column width="sixth" width_laptop="third" width_tablet="half"]Content[/column]


            [column width="sixth" width_laptop="third" width_tablet="half"]Content[/column]


            [column width="sixth" width_laptop="third" width_tablet="half"]Content[/column]


            [/row]
In the example above the columns will be full-width on phones. From Tablet size (768px) they will be transformed to 2 columns per row. From laptop size (1024px) of the screen, there will be 3 columns per row and on big, desktop screens (1200px and more) there will be 6 columns in a row.
Global Attributes
All shortcodes support special attributes like "id", "style" and "css_class" to make it easy for you to add an ID, Class or inline css styles and further style them with CSS or add JavaScript functionality. If you know the basics of HTML and CSS you will know how to use them.
[button ... id="myOpenButton" css_class="myClassName" style="text-color: red;"]Button Text[/button]
To provide you with an option to change fonts, Qusq is fully compatible with free plugin Easy Google Fonts. It provides you an option to change all fonts across the Qusq theme.
The basic settings allows you to change fonts for "body, paragraph, headlines (h1-h6)".
Additional styles for changing menu, etc...
The settings of the plugin allow you to create a group and specify which classes it should be applied to. It might be enough to apply the font to “body”, but if you want to be precise and be sure everything is styled with the new font, you can apply it to all these:
			body,

			#map *,

			.ish-contact-form-box * h3,

			.widget_wpcom_social_media_icons_widget a,

			.justified-gallery > a > .caption,

			.justified-gallery > div > .caption
Only available in the Qusq Pro version.
The theme is fully compatible with WooCommerce! This awesome free plugin turns your website into advanced ecommerce shop. For detailed information about installing, setting the plugin up and importing demo content follow these links:
Only available in the Qusq Pro version.
To give you the ability to have your website in multiple languages, we Qusq ensures compatibility with the free qTranslate X Plugin.
You can download & install qTranslate X Plugin by navigating to Plugins > Add New in WordPress administration and using the search field to look for qtranslate-x. Then simply Install and Activate the plugin. For more information check the plugin page below:
Read more about qTranslate X Plugin →
Qusq Pro has a built in update checker, so whenever we release a new update or fixes, you will be notified right away in your WordPress Administration area.
Always backup the theme before deleting or updating it, to avoid losing any modifications.
Automatic Updates
To simplify the update process, if you have purchased the theme from our IshYoBoy.com shop, you can enter the obtained unique License Key and you will allow WordPress to do the update automatically without you having to do everything manually. All this directly from the WordPress Administration area.
Find your License Keys →
Don't have a valid IshYoBoy.com License?
If you have purchased the theme from another marketplace such as ThemeForest, Creative Market, MojoMarketplace, etc.. You can easily convert it to IshYoBoy.com license and use it.
Convert existing license →
Get new license →
Manual Updates
To update the theme using WordPress administration, activate a different theme in Appearance > Themes, delete the current Qusq Pro theme and upload the newest version the same way as you first installed the theme. Once done, activate the theme and it's done.
If you have an active license key from IshYoBoy.com applied to your theme, you will receive live update notifications to which allows one-click updates directly from your WordPress dashboard.
Recommended
Overall, the safest way to update your theme is to back-up your current theme folder and update the theme directly through WordPress administration with activated license. If something has gone wrong with the new version, you're just a few clicks away from getting things back to how they originally were by removing the new theme version folder and replacing it with the backed up one.
Please note that IshYoBoy is not responsible for content loss, database errors and such, which may happen to your WordPress install upon an incorrectly applied theme update.
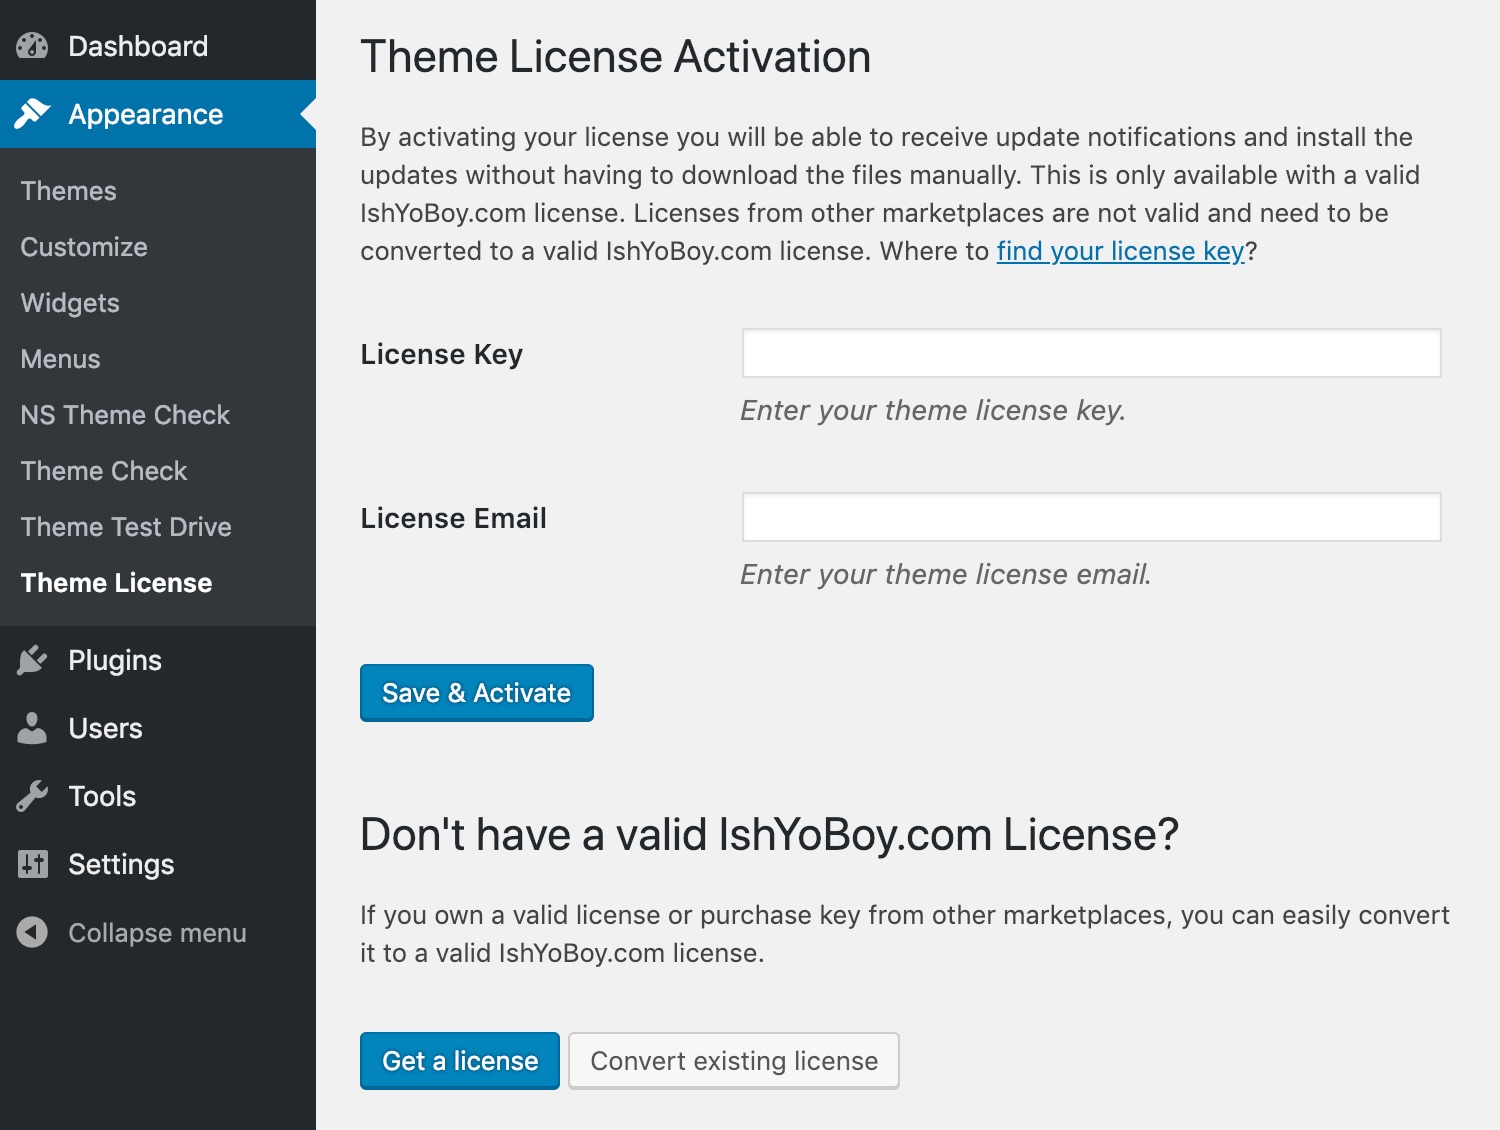
Once you've located your license key on your purchase receipt, you may enter it by navigating to Appearance > Theme License in WordPress administration area.
Once your license key and email used during the purchase are entered, hit the "Save & Activate" button and your license will be automatically activated. Upon a successful activation you'll see a green “License key is active” notification.
Please note that licenses are only given for Qusq Pro - not the free version.
What is the license key for?
It is important to keep your license up to date in order to continue getting updates for your IshYoBoy WordPress theme and support for any issues you may encounter. Renewing your license grants you access to support and updates for a year, including all updates for bug fixes and feature introductions.
Without a valid theme license, you will be unable to get support and receive theme updates.
Find your License Keys →
What if my license key has expired?
License keys may be renewed at on our website. You will get a renewal notification if your license is about to expire, or has indeed expired.
A child theme is a theme that inherits the functionality and styling of another theme, called the parent theme. Child themes are the recommended way of modifying an existing theme.
Why use a Child Theme?
The one main reason why you would want to use a child theme: If you modify a theme directly and it is updated, then your modifications WILL be lost. By using a child theme you will ensure that your modifications are preserved.
Installing the Child theme
Log in to your site's WordPress Administration, and go to Appearance > Themes. Click "Add New" and upload the qusq-pro-child.zip file.
Next simply click "Activate" and both the Qusq Pro theme and Qusq Pro child theme will be active on your WordPress site. Now you're ready to customize away.
Note that this is the same exact method we referred to in the Getting Started section of this guide. You should see your child theme listed and ready for activation.
Customizing Template Files
If you want to change more than just the stylesheet, your child theme can override any file in the parent theme: simply include a file of the same name in the child theme directory, and it will override the equivalent file in the parent theme directory when your site loads.
For instance, if you want to change the PHP code for the site header, you can include a header.php in your child theme's directory, and that file will be used instead of the parent theme's header.php.
Child Theme Functions.php
Unlike style.css, the functions.php of a child theme does not override its counterpart from the parent. Instead, it is loaded in addition to the parent's functions.php. (Specifically, it is loaded right before the parent's file.)
In that way, the functions.php of a child theme provides a smart, trouble-free method of modifying the functionality of a parent theme.
Adding PHP Functions
Say that you want to add a PHP function to your theme. The fastest way would be to open the qusq-pro/functions.php file and put the function there... But that's not smart: The next time Qusq Pro is updated, your function will disappear (as the entire contents of the /qusq-pro/ folder are replaced upon an update.
However, there is an alternative way which is the smart way: you can create a child theme, add a functions.php file in it, and add your function to that file. The function will do the exact same job from there too, with the advantage that it will not be affected by future updates of the parent theme.
DO NOT copy the full content of functions.php of the parent theme into functions.php in the child theme. It's not a good practice by any means.
To learn more, read the this article on the WordPress Codex →
This WordPress theme uses Node.js, Bower and Gulp to make it easy to change, process and build the theme quickly.
Basic Users Modifications
For basic modifications we strongly recommend to use the standard, "compiled", theme version by us and use a Child Theme to do all modifications rather than changing the theme files. In this way you keep your theme untouched and your changes update-safe.
You can override all CSS styles instead of modifying the theme's generated style.css file and keep all changes in one place. Using you web browser's "Inspect Element" functionality will be of a great help.
For code changes you can either override the theme templates (e.g. "header.php", "footer.php", "page.php") or override existing PHP functions in the "functions.php" file of the child theme by coping their definition from the parent theme.
The smartest way to modify or add functionality is to use WordPress hooks for filters and actions. You can use "add_filter", "add_action" or "remove_filter" and "remove_action" functions add new code or remove unnecessary functionality from the theme. Again all remains update-safe as everything is separated from the parent theme.
Advanced Users Modifications
If you really need to modify the original theme files and accept the fact that your changes will not be update-safe and you will have to re-produce all changes every time you update the theme then go ahead with this guide.
We strongly recommend re-thinking the changes and trying to use Child Theme instead.
Before you can customize the template you must download and install Node.js (Cross-platform JavaScript runtime engine/environment) which includes npm (node package manager). Also make sure that Git is installed as some packages require it.
Then from the command line install all packages defined in package.json by entering command:
npm install
Once done, install Bower. It depends on Node.js and npm.
npm install -g bower
And download all necessary plugins defined inside bower.json file:
bower install
When all dependencies and plugins are installed without errors you can use the defaultgulp tasks to build the template into the dist folder and run file watchers.
gulp default
Now you can start modifying all theme files.
Theme Files Structure
The theme was built over Underscores (_S) starter theme provided by WordPress.org, so if you are familiar with it you already know what to expect.
All the code & necessary files are located inside /src folder which is also the final destination of the generated files.
CSS Files
All CSS files are written using SCSS. They are located inside /src/scss/ and processed and compressed into a single "style.css" file in the root of the /src folder.
You may notice a few PHP and regular CSS files. Those are used for dynamic CSS generation based on the Customizer settings or are directly included via WordPress's "wp_enqueue_style" function on a specific place.
JavaScript Files
All the javascript files are located inside /src/js/. The third-party plugins are manually copied using bower into the /src/js/bower/ folder and further enqueued by WordPress. The theme's main javascript functionality can be found inside "main.js" file.
PHP Functionality
The standard WordPress template files can be found in the root of /src folder as well as in /src/templates nad /src/template-parts with a self-explanatory titles.
The main php functionality is located in /src/inc folder. You can also find a theme specific modules here which all add a special functionality to the theme in a very modular way so each feature can be easily disabled or re-enabled.
Language and internalisation
The standard language file containing all strings from the theme can be found inside the /src/languages folder.
You can use Poedit application to load this file and translate all strings into the language you prefer. This is the standard way of translating any theme, plugin or WordPress itself.
Once done you need to save it using your language's abbreviations e.g. "de_DE" or "it_IT" and use the saved ".PO" and ".MO" files to be uploaded to you WordPress server.